by Igor | Jul 7, 2015 | Odoo
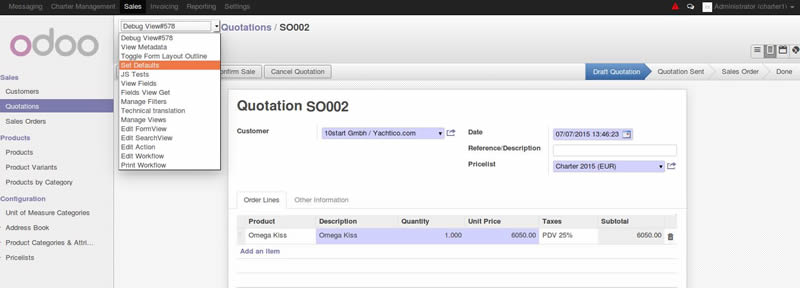
To set default value for a field in Odoo interface you have to activate the ‘developer mode’.
- Click on your name on the upper right corner
- Click on ‘About OpenERP’
- Click on ‘Activate the developer mode’
After that you should see a selection box on the top of each form.
Enter default value in a field and choose ‘Set Defaults’ from developer selection box.
You can also choose if it is default value to all users or only to you.
by Igor | Jun 23, 2015 | Linux, Odoo, Programming
It is possible to work on the local computer (workstation) with Ubuntu, local virtual machine or in a server over the network.
I prefer to do the development work in my personal workstation, using my favorite text editor or IDE.
So this is my development setup:
VirtualBox + Ubuntu + PyCharm
VirtualBox works on Linux, Windows and OS X so i can move VM’s from one platform to another.
The assumption is that you have installed Ubuntu desktop.
You can download and install Ubuntu from this location:
http://www.ubuntu.com/download/desktop/thank-you/?version=14.04.2&architecture=amd64
You can download and install VirtualBox from this location:
https://www.virtualbox.org/wiki/Downloads
The Ubuntu installation process has already guided you in the creation of a user.
You will use that user to setup you development environment.
First, make sure you are logged in as the user created during the installation process, and not as root.
Assuming your user is netjunky:), you can confirm your home directory and user with the following commands:
echo $HOME
whoami
Now we can install Odoo directly from the GitHub repository and install our favorite IDE.
1.) Install system updates
sudo apt-get update && apt-get upgrade -y
2.) Install Git
sudo apt-get install git -y
3.) Install PostgreSQL Server
sudo apt-get install postgresql -y
4.) Install Python dependencies
sudo apt-get install python-dateutil python-feedparser python-ldap python-libxslt1 python-lxml python-mako python-openid python-psycopg2 python-pybabel python-pychart python-pydot python-pyparsing python-reportlab python-simplejson python-tz python-vatnumber python-vobject python-webdav python-werkzeug python-xlwt python-yaml python-zsi python-docutils python-psutil python-mock python-unittest2 python-jinja2 python-pypdf python-decorator python-requests python-passlib python-pil python-pip -y
5.) Create a directory to work in. This will create work directory for your projects ~/projects/odoo-dev
mkdir ~/projects
mkdir ~/projects/odoo-dev
6.) Go into our work directory
cd ~/projects/odoo-dev
7.) Get Odoo source code from gitub (-b option asks to explicitly download the 8.0 branch of Odoo)
git clone https://github.com/odoo/odoo.git -b 8.0
8.) Install Odoo system dependencies. Just one more check with odoo.py script. I did not bother to investigate but if you try to run this command before step 4. you will get errors about missing python dependencies.
./odoo/odoo.py setup_pg
9.) Create PostgreSQL superuser
./odoo/odoo.py setup_pg
10.) Install wkhtml and place on correct place for Odoo
sudo wget http://downloads.sourceforge.net/project/wkhtmltopdf/archive/0.12.1/wkhtmltox-0.12.1_linux-trusty-amd64.deb
sudo dpkg -i wkhtmltox-0.12.1_linux-trusty-amd64.deb
sudo cp /usr/local/bin/wkhtmltopdf /usr/bin
sudo cp /usr/local/bin/wkhtmltoimage /usr/bin
sudo rm -rf wkhtmltox-0.12.1_linux-trusty-amd64.deb
To start an Odoo server instance, just run odoo.py:
~/projects/odoo-dev/odoo/odoo.py
Odoo server is ready and we can now install PyCharm or some other favorite text editor or IDE.
To install PyCharm community edition:
sudo wget -q -O - http://archive.getdeb.net/getdeb-archive.key | sudo apt-key add -
sudo sh -c 'echo "deb http://archive.getdeb.net/ubuntu $(lsb_release -sc)-getdeb apps" >> /etc/apt/sources.list.d/getdeb.list'
sudo apt-get update
sudo apt-get install pycharm -y
Run PyCharm
cd /usr/share/pycharm/bin
./pycharm.sh
Or you can skip all the steps and run this script:)
https://gist.github.com/netjunky-hub/ac65b479fc4a306ae6bc
Make sure you are not using root (don’t use sudo to run the script).
WARNING!
Script will download and configure Odoo, remove Libre office and install Apache Open Office, install useful tools like meld, pgadmin3 and poedit, download and install Odoo templates for PyCharm, create directories for custom config and custom addons.
You can adjust script to fits your needs.
Happy coding:)
by Igor | Jun 18, 2015 | Odoo, Programming
When you’re developing custom module or working on Python code, Odoo server needs to be restarted on every code change.
To make your life easier auto reload Odoo server after Python code change.
Option –auto-reload monitors the source code and automatically restart Odoo server if changes are detected.
Example of usage:
./odoo.py -d test_database --auto-reload
This is a Linux-only feature.
The pyinotify Python package is required, and it should be installed either through apt-get or pip:
Using apt-get:
sudo apt-get install python-pyinotify
Using pip:
pip install pyinotify
https://github.com/seb-m/pyinotify/wiki
Warning:
If you use PyCharm or some other IDE with auto save, disable auto save before using –auto-reload option.
Happy coding…
by Igor | Jun 8, 2015 | Odoo
Odoo 9 community vs. enterprise features. Document is still in draft.
| Services |
Odoo 8 |
Odoo 9 Community |
Odoo 9 Enterprise |
| Community Forum |
X |
X |
X |
| Upgrades to future versions |
/ |
/ |
X |
| Bugfixes Guarantee |
/ |
/ |
X |
| Support |
/ |
/ |
X |
|
|
|
|
| Features |
|
Odoo 9 Community |
Odoo 9 Enterprise |
| Accounting |
|
|
|
| Basic Accounting |
X |
Improved |
Improved |
| Accounting Reports |
static |
static |
dynamic |
| Statement Import: Coda |
X |
Improved |
Improved |
| Accounting Dashboard |
/ |
X |
X |
| Bank Interfaces (U.S., NZ, Canada) |
/ |
/ |
X |
| Statement Import: OFX, QIF |
/ |
X |
X |
| Check Printing & Deposit |
/ |
/ |
X |
| Customer Follow-ups |
basic |
basic |
Improved |
|
|
|
|
| User Interface |
|
|
|
| Desktop |
X |
Improved |
Improved |
| Android CRM |
/ |
X |
X |
| Mobile UI |
/ |
/ |
X |
| New Design |
/ |
/ |
X |
|
|
|
|
| Project Management |
|
|
|
| Tasks |
X |
Improved |
Improved |
| Issues |
X |
Improved |
Improved |
| Timesheets |
Former version |
Improved |
Improved |
| Timesheet Chrome plugin & mobile app |
/ |
/ |
X |
| Forecasts |
/ |
/ |
X |
|
|
|
|
| Sales Management |
|
|
|
| CRM |
X |
Improved |
Improved |
| Sales |
X |
Improved |
Improved |
| Contracts |
Former version |
Improved |
Improved |
| Customer Portal |
X |
X |
Improved |
| eSignature |
/ |
/ |
X |
| Subscriptions |
/ |
/ |
X |
| Digital products |
/ |
X |
X |
|
|
|
|
| Human Resources |
|
|
|
| Holidays |
X |
Improved |
Improved |
| Employee Directory |
X |
Improved |
Improved |
| Recruitments |
X |
Improved |
Improved |
| Appraisals |
Former version |
Improved |
Improved |
| Departments Dashboard |
/ |
X |
X |
|
|
|
|
| WMS |
|
|
|
| Inventory Management |
X |
Improved |
Improved |
| Barcode support |
Former version |
Improved |
Improved |
| Integration with UPS, Fedex, DHL, USPS |
/ |
/ |
X |
| Inter-company rules |
/ |
X |
X |
|
|
|
|
| Website Builder |
|
|
|
| Website Builder |
X |
Improved |
Improved |
| Blog |
X |
Improved |
Improved |
| Form builder |
/ |
/ |
X |
| Call-to-Actions Blocks |
/ |
/ |
X |
| Versioning |
/ |
X |
X |
| A/B Testing |
/ |
X |
X |
|
|
|
|
| eCommerce |
|
|
|
| Full eCommerce |
X |
Improved |
Improved |
| Authorize.net integration |
/ |
X |
X |
| Shipping Integration |
/ |
/ |
X |
| eBay Connector |
/ |
/ |
X |
| Amazon Connector |
/ |
/ |
X |
| Coupons |
/ |
/ |
X |
|
|
|
|
| Point of Sale |
|
|
|
| Point of Sale |
X |
X |
X |
| Point of Sale for Restaurants |
/ |
X |
X |
| Loyalty cards |
/ |
/ |
X |
|
|
|
|
| Marketing |
|
|
|
| Events |
X |
Improved |
Improved |
| Expenses |
X |
Improved |
Improved |
| Mass mailing |
X |
Improved |
Improved |
| Mass Mailing Templates |
/ |
/ |
X |
| Live Chat |
X |
Improved |
Improved |
|
|
|
|
| Misc |
|
|
|
| Usability improvements |
/ |
X |
X |
| Google Spreadsheet |
X |
X |
X |
| Document Management (slides) |
/ |
X |
X |
| Planner (first weeks onboarding) |
/ |
X |
X |
| Reporting |
X |
Improved |
Improved |
Odoo 9 Feature Split – OpenCore pdf version.
by Marijan Rajić | Jun 4, 2015 | Odoo
Small introduction
Cloudflare is a great set of services for its community and their websites. It can provide you with high quality tools that any webmaster could ever wish for. Your sites are much safer with these services, and you can easily grasp what is really happening out there around your little Internet web corner.
You can get your free Cloudflare account in couple of minutes, and with it, you get your brand new name servers. All the benefits of moving your domains to Cloudflare is subject to the completely new post. Here, I just want to show three easy little steps on how to activate subdomain filtering to your odoo server (Ubuntu 14.04).
Subdomain filtering? Well, would you like that web address http://base.yourdomain.com/ automagically opens odoo instance and web site with database named base ? Thats it.
Did I mention that Cloudflare would also create ssl certificates for all your domains? For free? Yes and all your odoo sites will be ssl green and trusted worldwide.
1st step (location: odoo server)
First step is really just following this post -> http://netjunky.net/run-odoo-on-port-80-instead-of-8069/
It will reroute all incoming port 80 traffic to odoo default 8069.
2nd step (location: odoo server)
On our odoo server, we need to modify odoo daemon script. Usually, you want to setup your production odoo server with odoo daemon/service script. Script is more or less standard and usually placed here -> /etc/init.d/odoo-server (odoo-server name is optional).
Here is the part you need to modify:
# Additional options that are passed to the Daemon.
DAEMON_OPTS="-c $CONFIGFILE"
And after the editing, DAEMON_OPTS line should look like this:
# Additional options that are passed to the Daemon.
DAEMON_OPTS="-c $CONFIGFILE --db-filter=^%d$"
Save changes to the script and then restart service:
user@server:~$ sudo service odoo-server restart
3rd step (location: Cloudflare dashboard)
On your cloudflare dashboard select your domain, and then DNS tool for managing your Domain Name System settings.
Add a new A record which points to your odoo server IP address -> example: A databasename points to 173.25.53.33
Open your browser with new address -> http://databasename.yourdomain.com/
Create new odoo database with name -> databasename (Note: it must be same as the subdomain name in the A record)
Repeate this step for every new subdomain you want to add.
Summary
And do you know what else? It works for all your different Cloudflare domains just as well, one odoo server with multiple domains and subdomains.
Obviously, you don’t want and can’t have two or more databases with the same name. So if you need to have something like erp.domain1.com and erp.domain2.com on the same server, you will need to use slightly different regular expression for database filtering -> instead of ^%d$ you should use ^%h$ .
If we define domain like this -> hostname.domain.com, then regular expression ^%d$ will filter out string hostname. On the other hand regular expression ^%h$ will filter out string hostname.domain.com.
In short, if you decide to go with regular expression ^%h$ , database name in the 3rd step should be hostname-domain-com (we need to switch dots with dashes).
This is solution when you want to host larger number of databases on one odoo server and you need to have even more flexible domain name choices.
Enjoy your brand new odoo nicely named instances!
Hey what about SSL stuff?
Well ask netjunky, maybe he can write something about that.
Recent Comments